TABLE OF CONTENTS
- 1. Displays
- 2. Display - Table actions
- 3 Row actions
This guide serves as a comprehensive reference for managing and interacting with the display list within the system. It is designed to support users in performing key tasks — from sorting and filtering display data to executing advanced actions like assigning products, pinging devices, and viewing connectivity history.
1. Displays
- Click on aspecific Installation.
A new page appears as demonstrated below.
- Click 'Displays'

A new page "Display page" presents two tabs — 'Displays' and 'Communicators', with 'Displays' selected by default."

- Global Search: Allows you to search by display number, Extended serial number, Attached product number, Attached product Description.
- Filter: Opens a slide-in panel where you can choose specific columns to apply filters.
- Table Actions: Located at the top of the window, offering various functional options.
- Settings: Enables you to select which columns are visible on the display page.
- List View: Displays the total number of items in a list format.
- Select All / Multi-Select: A checkbox next to each display for selecting one or multiple items.
- Sort Icon: Allows you to organize column data in ascending or descending order.
- Filter Icon: Enables you to apply filters to specific columns based on selected criteria.
- Column Resizer: Two thin lines between columns let you adjust their width by dragging left or right.
- Three Dots & Row Actions: Clicking the three-dot icon beside a row reveals additional actions.
2. Display - Table actions
To the right of 'Global Search', you can access a range of table actions—Add, Assign, Unassign, Flip, Refresh, Flash, and Delete—to manage and interact with display entries efficiently as discussed below.
Note: Each table action opens a corresponding slide-in as shown below.
2.1 How to add display(s)
- Click on the ‘+Add’ in the table actions.
Opens a slide as shown below (look at the back of the display to determine vendor):

Question icon: Offers guidance for navigating the process.
Hanshow: Click to add a Hanshow display to the installation.
Displaydata: Click to add a Displaydata display to the installation.
When clicking 'Hanshow'.
A slide-in opens as shown below.
Hanshow displays: Add displays - Slide-in:
Adding a Hanshow display follows the same process as Displaydata, except you must use either enter/scan:
The MAC address shown on the display, or
The extended serial number is printed on the back.
When clicking 'Displaydata'.
A slide-in opens as shown below.
Displaydata: Add displays - Slide-in:
This function allows you to add a display(s) to an installation. 
- Question icon: Provides guidance to help users navigate the process.
- Serial Number input field: Allows users to input serial numbers using three methods—File Upload, Paste, or Manual Entry.
- Displays counter: Shows the number of displays that have been added.
- Clear All: Removes all added displays from the list.
- Modes of adding displays.
- Add button: Becomes active only when displays are ready to be added.
- Cancel button: Allows users to exit and cancel the addition process.
2.1.1 How to add displays using File Upload
1. Click '+Add' from the table actions.
2. The 'Add Displays' slide-in panel opens as shown below.

3. Click the File icon to upload your file.
Once uploaded, the slide-in will show the total number of displays added.
The 'Add' button at the bottom becomes active when displays are ready to be added.
- Click ‘Add’
A message pops up as shown below to confirm the action.
- Check the displays tab
All five displays have been successfully added.
2.1.2 How to add displays using Paste
1. Click '+Add' from the table actions.
2. The 'Add Displays' slide-in panel opens as shown below.

3. Copy the serial numbers of the displays to be added to the installation.
4. Click 'Paste'.
The system will give a pre-validation result as shown below:
5. The 'Add' button at the bottom becomes active when displays are ready to be added.
6. Click 'Add'.
7. A message pops up to confirm the action as shown below.
- Check the displays tab
All five displays have been successfully added with status marked as ‘Okay’.
2.1.3 Add displays using '+'
1. Click '+Add' from the table actions.
2. The 'Add Displays' slide-in panel opens as shown below.
3. Type, scan or "Copy and paste" the serial number of the display and click '+'. One display is added at a time.
Note: For Hanshow displays, use the MAC address or the Extended serial number.
Slide-in is updated as shown below.

Note: Continue following the same steps until all desired displays have been added to the installation.
The 'Add' button at the bottom becomes active when displays are ready to be added.
- Click 'Add'.
A message pops to confirm the action up as shown below.

- Check the displays tab.
Two displays have been successfully added with status marked as ‘Okay’
2.2 How to assign a product to a display
Assign: This function allows you to assign/add a product to the display(s) registered in an installation.
- Click'Assign' in the table actions.
- A slide-in - 'Assign display' opens as shown below.

- Displays three Fields:
A. Display Serial Number –This field is mandatory and must be entered to proceed.
B. Layout – This field is auto-filled once the display number is entered. If multiple layouts are available for the selected display, a dropdown menu allows you to choose the appropriate one.
C. Product: Start typing a product number to see matching options and select from the suggestions. Alternatively, enter the product name to see matching results and select from the suggestions. - Assign: Present at the bottom of the slide-in. Press when you are ready to assign.
- Cancel: Press this tab if you want to cancel the assignment.
- Assign More: A checkbox labeled 'Assign More' appears at the bottom, allowing you to assign multiple products simultaneously.
7. Once the products are assigned, review the display page.
Hanshow: Assign display slide-in:
OBS: MAC Address and Layout are pre-filled in the slide-in.
Note: The rest of the process is similar to displaydata as shown above.
Note: You can personalize and view the columns by adjusting the column settings as previously explained.
1. Display: List of added displays.
2. Type: Layout definitions of the displays
3. Failed: Status of the displays
4. Status: Status of the displays
5. Battery: Status of the battery
6. Attached Product no: Serial number of the product attached to the display.
7. Attached product description: The description of the product displayed on the display.
8. ConfigurationStatus: Shows whether the display is configured or not.
9. Last communication status: Timestamp of when the display communicated with the Antenna.
10. Records: Shows the number of displays.
NOTE: In addition to product assignment, this slide-in panel will also support assigning Office 365 and Prestige, subscription for this option can be purchased.
.

2.3 How to unassign a product from a display
Unassign: This function allows you to unassign a product from a display in an installation.
- Click Unassign in the table actions.
The slide-in panel opens with the title 'Unassign Displays'.
Note: The rest of the flow is the same as 'Add'.
At the end of the process, a confirmation box pops up as shown below.
1. Type 'Unassign'
2. Click 'Confirm'

A message pops up to confirm the action as shown below, with the number dynamically reflecting the amount of unassigned displays.
- Check the displays.
The product will be removed from the display, leaving the display blank.
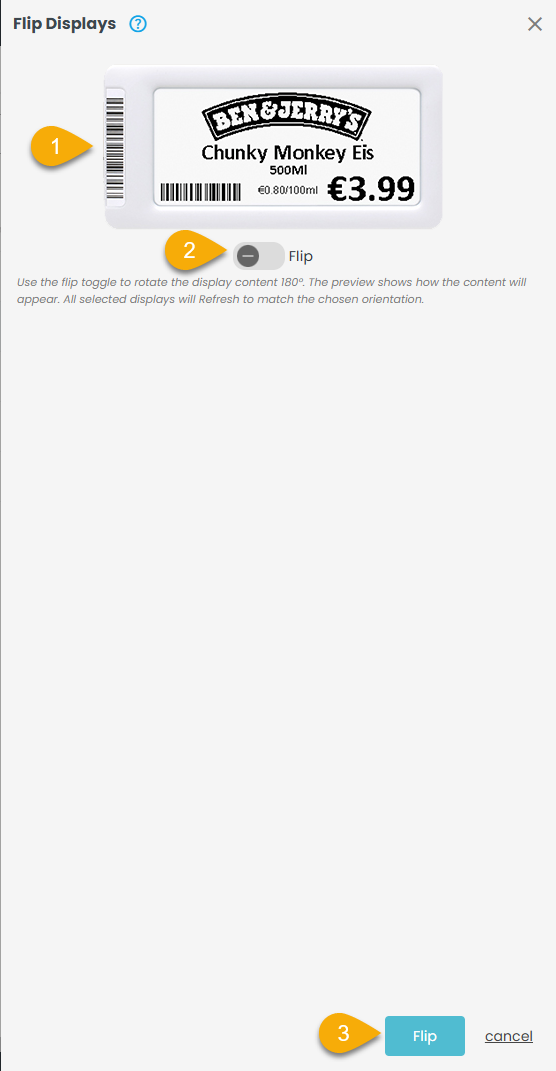
2.4 How to flip
Flip: This function allows you to flip a product on a display in an installation.
- Click 'Flip' in the table actions.
The slide-in panel opens with the title 'Flip Displays'.
A preview of the display is visible within the slide-in.
A 'Flip' toggle is available to rotate the display view.
Note: The rest of the flow is the same as 'Add'
Before Flip:

After Flip:

2.5 How to refresh
Refresh: This function allows you to update a display in an installation.
- Click 'Refresh' in the table actions.
The slide-in panel opens with the title 'Refresh Displays'.
Note: The rest of the flow is the same as '+Add'.
2.6 How to flash
Flash: Triggers the display to flash, helping users quickly locate it among many products.
- Click 'Flash' in the table actions.
The slide-in panel opens with the title 'Flash Displays'.
Note: The rest of the flow is the same as '+Add'.
2.7 How to ping
Ping: This function enables communication with a display to retrieve its current temperature and battery status.
- Click 'Ping' in the table actions.
The slide-in panel opens with the title 'Ping Displays'.
Note: The rest of the flow is the same as '+Add'.
OBS: The Ping function is not supported on Hanshow displays.
2.8 How to reconfigure
Reconfigure: This function facilitates reconfiguring a display, typically used when a display fails to integrate into the system.
Note: Running this action will delete the display from the system and attempt to re-add it from scratch.
- Click 'Reconfigure' in the table actions.
The slide-in panel opens with the title 'Reconfigure Displays'.
Note: The rest of the flow is the same as '+Add'.
OBS: The Reconfigure function is not supported on Hanshow displays.
2.9 How to delete
Delete: This function removes the displays from the system and sets their status to inactive.
- Click 'Delete' in the table actions.
The slide-in panel opens with the title 'Delete Displays'.
Note: The rest of the flow is the same as '+Add'.
At the end of the process, a confirmation box pops up as shown below.
- Type 'delete' and click 'Confirm'

A message pops up to confirm the action as shown below, with the number dynamically reflecting the count of deleted displays.

- Check the display table.
The deleted displays are removed from the Installation and cannot be seen in the list of displays.
3 Row actions
They refer to the set of functions available for a specific row within a table.
3.1 How to assign a Single display using row actions:
- Click the three-dot icon next to each display as shown below.

Opens a dropdown menu with options such as Details, Actions- Add, Assign, Unassign, Flip, Refresh, Flash, Delete, and History- Assign History and Communication hsitory.
3.2 How to use row actions for multiple displays :
- Select the desired displays using checkboxes
- Click the three-dot icon
Opens the row actions dropdown.

Note: Details, Assign, and Assign History are disabled for multiple displays as shown above.
OBS: ‘Ping selected’ and ‘Reconfigure selected’ are available only for Displaydata displays.
3.3 Details
- Click 'Details'.
3.3.1 Details - Overview
Opens a slide-in with three tabs - Overview (default), Connectivity, and History as shown below.
Screenshot must be updated after the enhancement- regarding the status field must be implemented.
Display data:  OBS: For Hanshow displays, ‘Extended serial number’ replaces ‘Lookup table’.
- Header: Shows "Details" along with the display's serial number.
- Top Actions: Includes Assign, Unassign, Flip, and Flash options.
- Navigation: Use arrow icons to browse displays without leaving the view.
- Menu (three dots): Provides access to Refresh, Ping, Reconfigure, and Delete functions.
Note: For Hanshow displays, Ping and Reconfigure are not supported and therefore hidden. - Battery & Warranty: Indicated by a battery icon and a question mark symbol.
- Info: Displays the model and firmware version.
- Layout Configuration: Presents a visual preview, type, dimensions, and page number.
- Content: Shows product number and name; clicking the number opens a slide-in with product details.
- Click on the back arrow in the right corner of the slide-in. Navigates back to' Display Overview' again.

- Click on the back arrow in the right corner of the slide-in. Navigates back to' Display Overview' again.
3.3.2 Details - Connectivity
- Click on Connectivity
Opens a slide-in panel, as illustrated below, containing the following information:
- Header: Displays the "Details" label along with the display's serial number.
- Navigation: Use arrow icons to browse through displays without leaving the page.
- Top Actions: Includes Assign, Unassign, Flip, and Flash functions.
Menu (3 dots): Access Refresh, Ping, Reconfigure, and Delete. - Communication: Shows the last communicator ID, the most recent successful communication, and latest attempt.
- Configuration Status: Indicates the current configuration state and its timestamp.
- RF Info: Lists radio frequency parameters.
- Health Monitoring: Records the timestamp of the latest health check.
OBS: For Hanshow, only Communication details are displayed.
3.3.3 Details - History
Note: This tab is identical for Hanshow and Displaydata.
1. Click on History.
Opens a slide-in, as illustrated below, containing the following information:

2. Communication History: Shows timestamp and event details.
3. Assign History: Includes timestamp, location, and content.
4. Admin can view both the Communication History and Assign History logs by clicking 'See all logs' located under each respective section.
Key points:
- Assign and Flip always open a slide-in, whether triggered from row or table actions.
- Unassign, Flash, Refresh, Ping, Reconfigure, and Delete display a message for single displays across all views.
- For multiple or all displays, Unassign and Delete triggers a confirmation box.
3.4 Row actions - Assign
3.4.1 A single display
1. Click on the row actions
2. Select 'Assign'.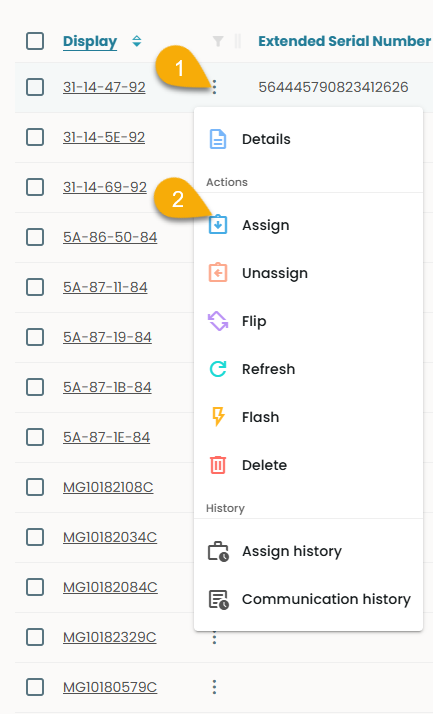
3. A slide-in 'Assign to display' opens with the display serial number and layout pre-filled.
4. Type the product number or product name in the field 'Product'.
- A dropdown with suggestions shows up.
4. Select one
5. Click 'Assign' at the bottom of the slide-in.
- A message appears to confirm the assign job has started.
6. Check the display.
- The product is assigned and can be seen on the display.
3.4.2 Assign more
- Check the box at the bottom.
8. A slide-in opens as shown below.
- Enter the serial number and follow the previously outlined steps.
Note: The Assign function in the Details view operates in the same manner.
3.5 How to unassign
Single: Row actions → Unassign → A message pops up and confirms → Product removed (Same in Details view)
Multiple: Select checkboxes → Row actions → Unassign selected → Confirmation box →Type &Confirm → Message confirms → Products unassigned.
3.6 How to Flip
Single:
- Click on the row actions
- Select 'Flip'
The 'Flip Displays' slide-in opens with the following:
1. Display preview
2. Flip the toggle
3. Flip the button at the bottom as shown below.
- Click on the Flip toggle.
- Click 'Flip' at the bottom.
A message pops up and confirms that the flip job has started.

- Check the display.
The product preview is flipped on the display.
Note: The flip function in the Details view operates in the same manner.
Multiple: Select checkboxes → Row actions → Flip selected → Message → Product preview flips on displays.
3.7 How to refresh a display
Single: Row actions → Refresh → A message pops up and confirms → Display blinks (Same steps apply in Details view)
Multiple: Check boxes → Row actions → Refresh selected → Message → Displays blink
3.8 How to flash a display
Single: Row actions → Flash → A message pops up and confirms → Display flashes (Same steps apply in Details view)
Multiple: Select checkboxes → Row actions → Flash selected → Message confirms → Displays flash Note: LED blinks if supported
3.9 How to ping a display
Single: Row actions → Ping → A message pops up and confirms→ Temp & battery updated (Same in Details view)
Multiple: Select checkboxes → Row actions → Ping selected → Message → Temp & battery updated.
Hanshow: Ping not supported.
3.10 How to reconfigure a display
Single: Row actions → Reconfigure → A message pops up and confirms → Status updates to Okay (Same in Details view)
Multiple: Select checkboxes → Row actions → Reconfigure selected → Message → Status updates to Okay
Hanshow: Ping not supported.
3.11 How to delete a display
Single: Row actions → Delete → A message pops up and confirms → Status updates to Okay (Same in Details view).
Multiple: Select checkboxes → Row actions → Delete selected → Confirmation box →Type &Confirm → Displays deleted
Caution: This rarely used function permanently deletes the display and its configuration from the system.
Displays must be reconfigured before they can be used again.
3.12 How to view Assign history
This function is exclusive to single display selection and becomes disabled when multiple displays are selected.
- Click on the row actions of a display whose status is 'Okay'
- Select 'Assign history'.
A new tab opens as shown below.
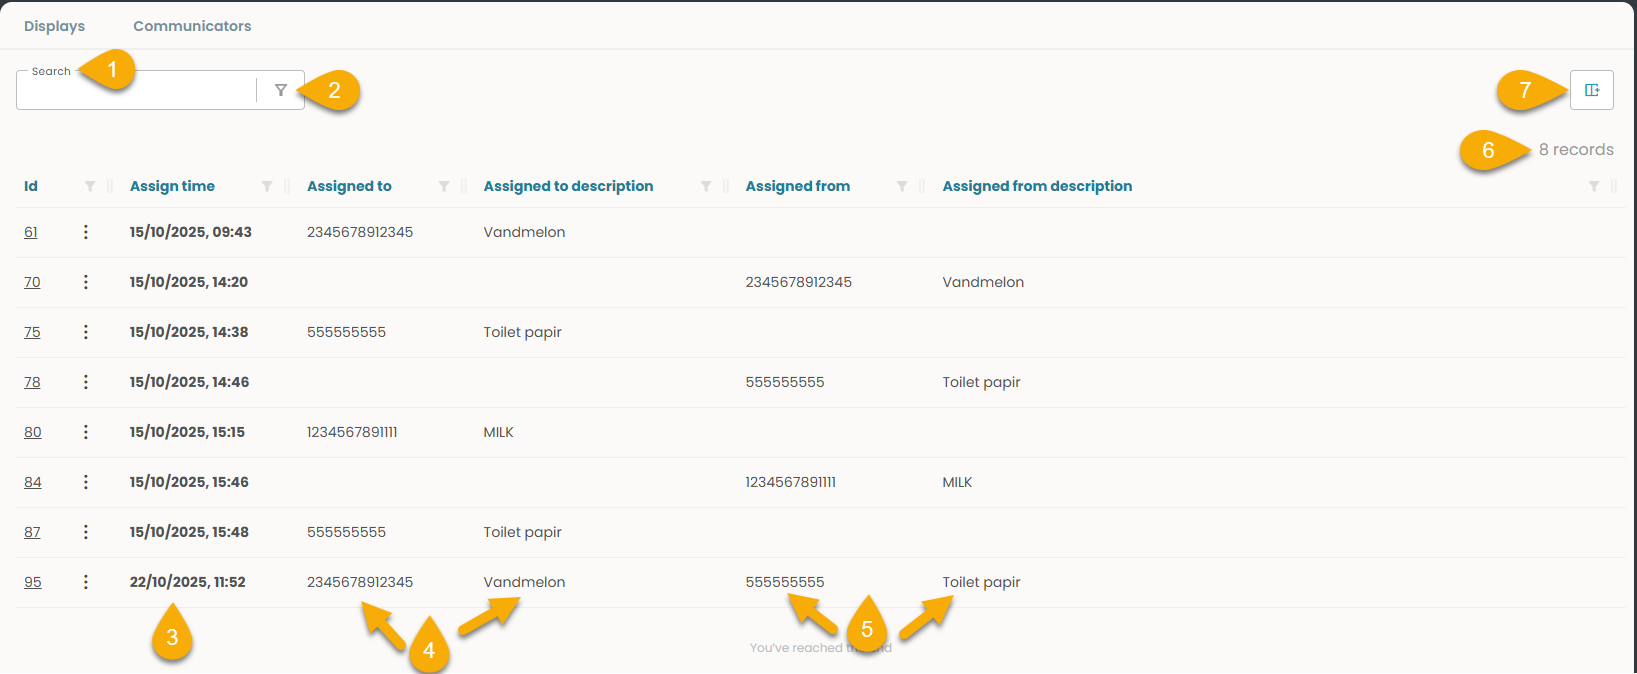
1. Global Search: Allows searching across all assignment history records using keywords.
2. Filter: Enables narrowing down results based on specific criteria, depending on the columns selected.
3. Assigned Time: Displays the timestamp when the display was assigned, helping track assignment chronology.
4. Assigned To & Assigned To Description: Shows the target display that was assigned to, along with a description.
5. Assigned From: Indicates the source entity from which the display was reassigned.
5. Assigned From Description: Provides context details about the source of the assignment.
6. Column Settings: Enables customization of which columns must be visible in the Assign History table.
7. Records: Displays the total number of assign history entries matching the current filters or search criteria.
3.13 How to view Communication history
This function is exclusive to single display selection and becomes disabled when multiple displays are selected.
- Click on the row actions of a display whose status is 'Okay'
- Select 'Communication history'.
A new tab opens as shown below- Screenshot must be updated and the definition under.
1. Global search:
2. Filter:
3. ID:
4. Last Update:
5. Created:
6. Type:
7. Status:
8. Step:
9. Visible page:
10. Failed reason:
11. Voltage:
12. Temperature: