TABLE OF CONTENTS
This guide helps the reader to understand how to navigate and manage all product‑related information in a centralized view, supporting tasks such as searching, reviewing, importing, and customizing data.
1. Products
This section allows the reader to access a complete overview of all products, search for specific items, import new products, customize the table layout, and review key product details such as status, design pages, references, and locations. It provides a central place to manage and analyze product information efficiently
- Click on ‘Products’.

Opens a tab titled - Products as shown below.

- Global search: Finds records by Product number, Description, Reorder code, Product reference Code.
- Import products: Enables importing products through drag‑and‑drop or file upload.
- Column settings: Customize visible columns and layout.
- Records: Total entries currently shown.
- Product number: Unique identifier for product tracking.
- Description: Brief product summary.
- Status: includes Active/Inactive/Not in use.
- Last updated: Most recent modification timestamp.
- DesignPage 1: Each display supports up to three imported designs. The design is selected from the product import.
- DesignPage 2: The design is selected from the product import.
- Reorder code: Customers' EAN identity of the product
- Reference count: Used as an alternate identifier for a product, a single product can have multiple references.
- Location count: Used as an alternate identifier for a product, a single product can have multiple references.
- Filter: Refines results by status, date, or category.
Note:All columns support filtering.
All columns are sortable, except for the 'Product Reference Code'.
1.1 Row actions
As you explore the product list above, here you can access additional options through the row actions menu, giving you quick entry to key functions.
- Click on the row action (3 dots) on the right side of the product number, as shown below.
Shows 'Details' and 'Manual values'.

1.1.1 Details
Opening the Details panel feels like entering the product’s own workspace—where its information, displays, and campaigns come together in a structured view that lets you explore each element naturally and without leaving the page.
- Click on 'Details'
A slide-in panel opens with the 'Overview' tab selected by default, along with sections for Data, Manual Values, and History.
1.1.1.1 Overview
The panel is titled 'Details – XXXXXXXXXXX' and presents sections for Product Information, Assigned Displays, and Campaigns.

Heading of the slide-in: Details with product number.
Navigation: Use arrow icons to browse products without leaving the page.
Product Information: Includes description, reference details, last updated timestamp, and associated locations.
Assigned Displays: Lists type, battery level, status, and a clickable serial number.
Campaigns: Shows campaign name, start date (From), and end date (To).
- Click on the display number under ‘Assigned displays’.
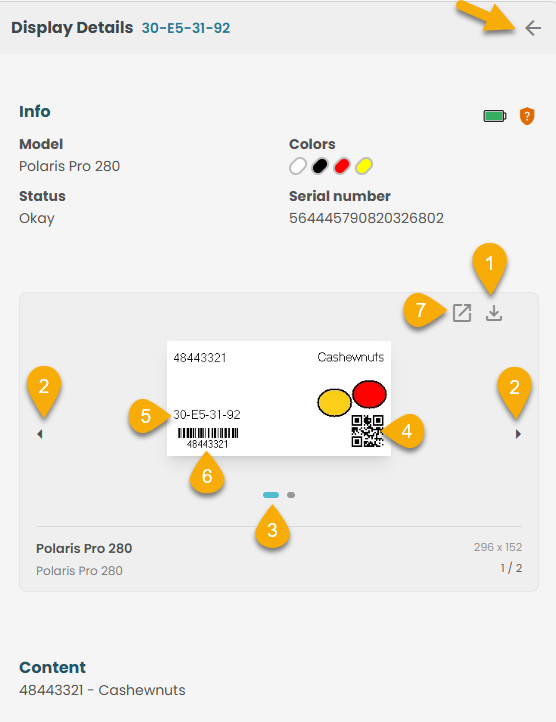
The admin is directed to the Display Details slide-in panel, as illustrated below.
- Click on the arrow in the right corner of the slide-in.
Returns to the Product -details slide-in again.
Lay out Configuration:
1. Click the 'Download' icon to open and save the file.
2. Use the arrows to switch preview designs according to the layout.
3. Indicates the currently selected design page / Number of pages.
4. A scannable code that provides quick access to device information or setup details.
5. The unique serial number of the display used for tracking, support, and warranty purposes.
6. A machine‑readable code used for inventory, scanning, or device identification.
7. Expand icon - when clicking it enlarges the image or opens it in a larger viewer
1.1.1.2 Details - Data
As you step into the Data section, the product opens up in a new light—each value laid out before you, each one carrying a story of where it came from, shaped by the import settings that define its source.
The data originates from various sources. When configuring the import settings, you can specify the source type as File, Manual, Static, Dynamic, or External."
- Click on 'Data'
Opens a slide-in as shown below.
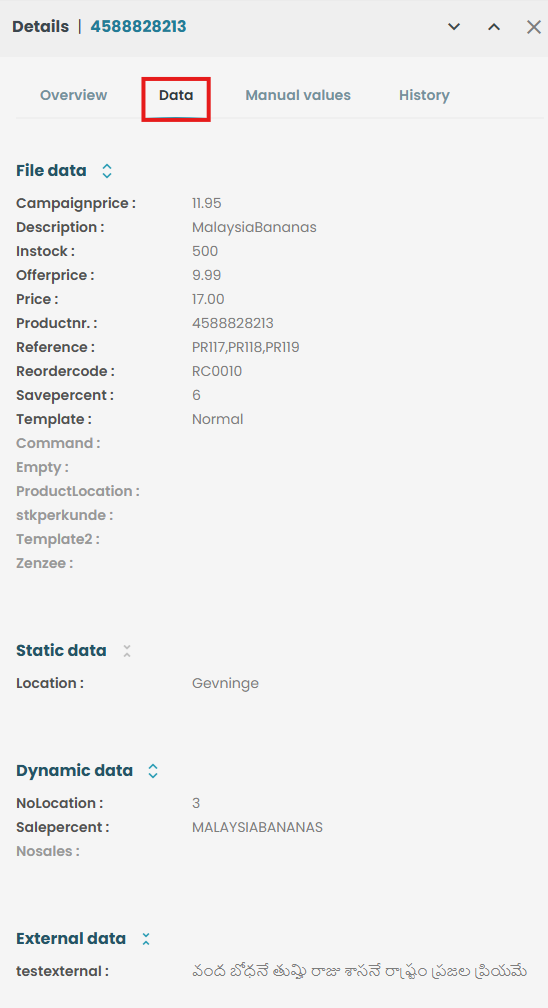
File data: All the information shown on the display.
Static data: Data that does not change over time or remains constant.
Dynamic data: Data that changes frequently and is editable.
External data: Data that is set by using an external API.
1.1.1.3 Details - Manual values
Manual values are the values you can add and can be viewed based on the conditions you have set.
This step allows you to enter or adjust manual values for the selected product, giving them control over data that is not automatically generated and can be customized based on specific conditions.
- Click on 'Manual values'.
Opens a slide-in as shown below.

- Click on the 'Edit' icon.
Opens a slide-in as shown below.

- Edit the manual values (from the dropdown /check box).
- Click 'Save'
The manual values are edited and saved.
1.1.1.4 Details - History
This step allows you to review the complete history of the product, making it easy to track previous actions, understand when changes were made, and see how the product has evolved over time.
- Click on 'History'
A slide-in panel appears, displaying the Product History along with timestamps and corresponding events, as shown below.

Heading of the slide-in: Details with product number
Navigation: Use arrow icons to browse products without leaving the page.
Product history: Shows events along with timestamps.
File Icon: Interactive and clickable for additional actions.
- Click on the 'File' icon as shown above.
Opens a slide-in with Product details.

- Click on the arrow in the right corner of the slide-in.
You are navigated back to 'History' again.
1.1.2 Row actions - Manual values
This section provides insight into the additional options available for each row.
- Click on the row actions (3 dots) as shown below.
Shows 'Details' and 'Manual values'.

- Click on 'Manual values'
A slide-in panel appears as shown below, where the fields can be edited and saved as previously explained. (under - Product- Details- Manual values)
2. Import products
This section explains the workflow for importing products and helps the reader understand each step clearly.
2.1 How to import products
- Click 'Import products'.

A slide‑in panel titled Import products(1)appears, offering two file‑import options—drag and drop or choose a file (2)—along with Import (3)and Cancel (4) actions.

- Click 'Drag & drop'.
Your file browser opens so you can select the import file. - Drag and drop the file into the slide‑in panel.
The import file is now ready and visible in the slide‑in panel as shown below.
Note: The file type you upload must match the file type defined in the configuration.
- Click 'Import' at the bottom of the slide‑in.
A snackbar message appears confirming product import started.
Note: Follow the same steps to upload a file, but click 'Choose a file' instead. Select your file, and the remaining process stays the same.
2.2 Import history list page
The Import History page gives you a complete overview of all past import activities.
- Refresh the page.
- Click on 'Import history'.


1. Filter: Narrows the list by status, date, or category.
2. File name: Displays the name of the imported file.
3. Type: Shows the file format used for the import - XML/CSV/TXT.
4. Created: Shows the timestamp when the import request was created.
5. Started: Shows the timestamp when the import process began.
6. Ended: Shows the timestamp when the import process finished.
7. File length: Displays the size of the file.
8. Import status: Indicates whether the import is completed successfully, failed, skipped, or is partially successful.
9. Id: Unique identifier for the import job.
10. Failure reason: Provides the error message if the import fails.
11. Column settings: Customize visible columns.
12. Records: Total entries currently shown.
2.2.1 Row actions
The Row Actions section gives you quick access to the tools and options available for each entry, allowing you to perform specific actions directly from the list without navigating away from the page.
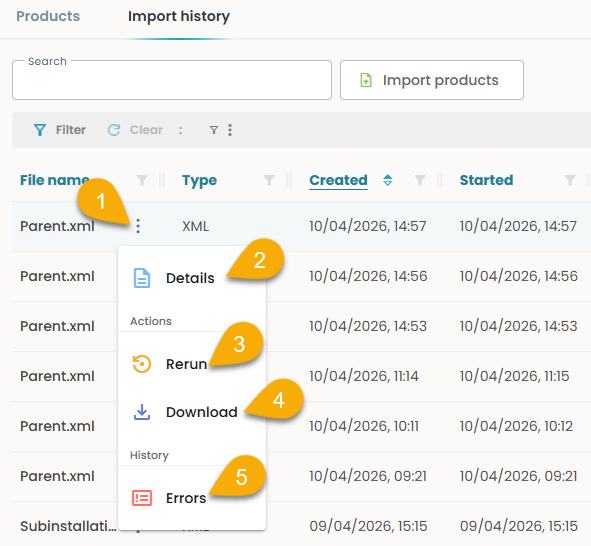
- Click on the row action (3 dots - (1)) on the right side of the file name, as shown below.
Opens a drop down with Details (2), Actions - Rerun (3), Download(4), History - Errors(5).
2.2.1.1 - Details
- Click on the Details (2) shown in the above screenshot.
Opens a slide-in as shown below.
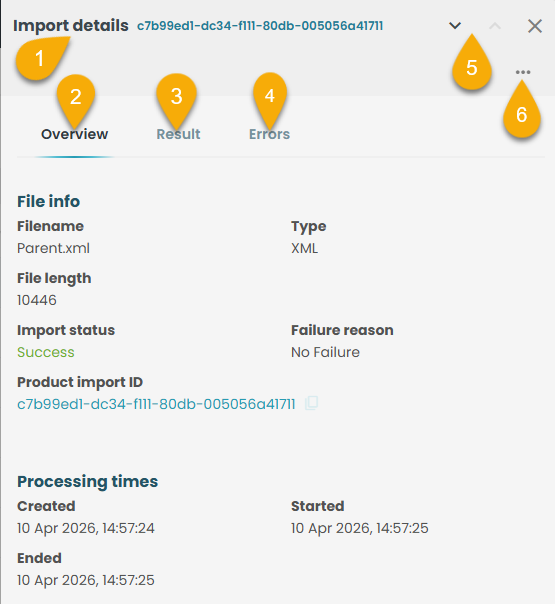
1. Import Details: Displays the slide-in name and its unique Import ID.
2. Overview: Default landing view showing key import information.
3. Result: Provides a summary of the import outcome.
4. Errors: Lists all errors when an import fails.
5. Navigation: Use arrow icons to move through import history without leaving the page.
6. Menu Actions: Access additional actions related to the import - Rerun, Download.
2.2.1.a - Details: Overview
This section provides detailed info of the imported file and its processing timeline as outlined below.

1. File Info
File name: The original name of the uploaded file.
File length: Total number of rows or records contained in the file.
Import status: Current state of the import (e.g., processing, completed, failed).
Product Import ID: A unique identifier assigned to this specific import.
Type: Indicates the category or format of the import.
Failure reason: Explains why the import failed, if applicable.
2. Processing Times
Created: The timestamp when the import request was first generated.
Started: The timestamp when the system began processing the import.
Ended: The timestamp when the import finished processing.
2.2.1.b - Details: Result
This section summarizes how each row in the import was handled, including counts for updates, additions, deletions, failures, and other processing outcomes.
- Click on 'Result'.
Opens as shown below.

Total lines: The total number of rows processed from the imported file.
Updated: The number of existing records that were successfully modified.
Added: The number of new records created /added to the import file.
Deleted: The number of records removed from the import file.
Discarded: The number of rows ignored because they were invalid or not applicable.
No update: The number of records that matched existing data but required no changes.
Failed: The number of rows that could not be processed/imported due to errors.
No product to delete: The number of delete requests where no matching product was found.
Retries: The number of times the system attempted to reprocess failed rows.
2.2.1.c - Details: Errors
- Click on 'Errors'.
Shows a list of errors as shown below.
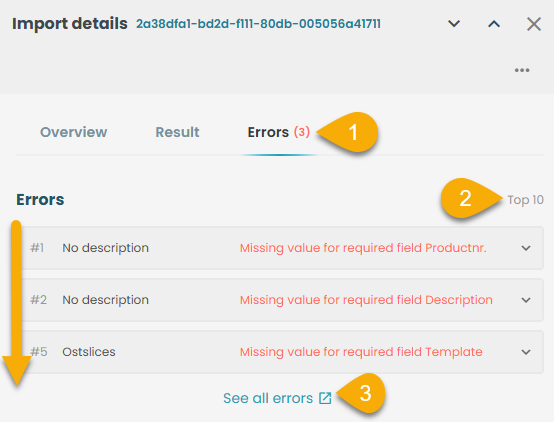
1. Errors: Displays the total number of errors detected during the import.
2. Top 10: Shows the first ten errors identified in the process.
3. See all errors: Provides an option to view the complete list of errors.
- Click on the down arrow as shown in the screenshot below.
Opens more info like status time, Product number, description, Raw data.

- Click 'See all errors'.
Opens a list page of Import errors as shown below.

1. Import Errors: Heading of the page displaying all errors generated during the import process.
2. Import history with ID: Shows the unique import ID associated with the selected Import ID.
3. Global search: Allows searching for records by filename.
4. Filters: Narrows the list.
5. Line no: Indicates the row number in the imported file where the issue occurred.
6. Product number: Displays the product number associated with the failed import.
7. Description: Provides details describing the product that failed to import.
8. Updated: Shows the timestamp indicating when the error was last updated.
9. Started: Shows the timestamp when processing for that record began.
10. Message: Displays the error message or system feedback for the record.
11. Changed template: Indicates if the record was affected by a template change.
12. Duplicated: Flags records that appear more than once in the import file.
13. Column settings: Allows customization of which columns are visible in the table.
14. Records: Shows the total number of entries currently displayed in the list.
15. Back arrow: A click on this helps to navigate back to the import history list page.
2.2.1.d - Details: Menu actions
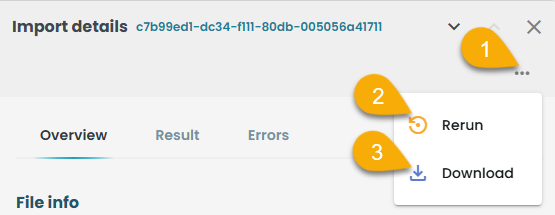
Menu actions (1): A click on this shows - Rerun(2) and Download(3) as shown above.
Rerun(2):
- Click 'Rerun.
A confirmation box pops up as shown below:
- Click 'Rerun import'.
A snack bar message pops up - 'Rerun import started'.
- Refresh the page and check the rerun import status in the list page for Import history.
Download (3):
- Click 'Download'.
The import file is downloaded to the device.
2.2.1.2 Row actions - Rerun
- Click the three‑dot menu to the right of the file name shown below.
A dropdown appears with Details, Rerun, Download, and History – Errors.
- Then follow the same steps you use in the Details slide‑in under section 2.2.1.d.

2.2.1.3 Row actions - Download
- Click the three‑dot menu to the right of the file name as shown above.
A dropdown appears with Details, Rerun, Download, and History – Errors.
- Then follow the same steps you use in the Details slide‑in under section 2.2.1.d.
2.2.1.4 Row actions - Errors
- Click the three‑dot menu to the right of the file name as shown above.
A dropdown appears with Details, Rerun, Download, and History – Errors.
- Then follow the same steps you use in the Details slide‑in under section 2.2.1.c.